Though I didn’t blog a ton (oops took all of December off!) we had a wonderful year.
January was forest school, birthday fun, friends, and cozy time at home.


February was full of snow! More than we usually see, which made it so special. Tuesday still has a little in the freezer. The end of the month saw us in Hawaii.


The first of March we were still soaking up the sunshine, and we came home feeling the need to be outside, warm or not! Tuesday finally took an interest in her balance bike, the addition of a cardboard baby doll seat sure helped. We started 100 days of happiness and ended the month with our 7th wedding anniversary.


April was full of lots of everyday goodness, including a return to some warm (unseasonably so!) weather. We even had our first dinner outside of the year. Forest School continued on, but in tee shirts instead of full rain gear. Started planning and scheming the garden, even buying olive trees. Plants started blooming. Tuesday and I took a homeschool train trip to Seattle and back… in one day. And then left for California; a quick trip to visit my dad. It got so hot by the end of the month apparently we all needed tank tops and naps with out blankies!


In May I tried to hire someone to work in our yard, but it turns out I’m only satisfied with me being the one to do all the work (and oh do I love it!). So I let perfection in the yard go and dug in. Dinners on the front porch were back on. Chatting with neighbors as we lounged and ate, nothing better. The muddy river looked quite different once the sun came out at Forest School. Tuesday enjoyed herself at a sheep to shawl show, we were about halfway through Laura Ingalls Wilder series by now and in full on “prairie girl” mode! By the end of the month we were covered in dirt by early afternoon nearly everyday.


June wrapped up Forest School, dance and girl scouts for the year, along with most obligations of any kind and it was full on summertime bliss. I pared my clothes, accessories and shoes down to a total of 33 items for the summer and LOVED IT. I easily stuck to this and feel so much more in love with myself with much less! Started composting, and reading more about permaculture.


July was rag curls, playing in the creek in undies, first sparklers on the forth of July. Camping in the backyard, bouncing in the bounce house. Impromptu trips to the coast to cool down. Eating lots from our own yard. The bounce house. Beading in the cool basement. Bennet turning two! The canning madness started. Water fountains were splashed in. We had a grape arbor built.


In August I got a pressure canner so I could do something with all those beans. We participated in Salem Harvest picks, and I said yes to zucchini from everyone. There was a drive in movie, and of course more canning. Ceara and I had a crazy week that involved watching Bruno Mars, then flying to California to see a taping of So You Think You Can Dance (barely!). I took Tuesday to her first Girl Scout camp. We said goodbye to my mom’s old place, where she lived for 21 years and hello to having her and Bill in the neighborhood for good! I turned 34 and went to the State Fair, of course.


September was no spend month, our favorite. We cleaned and organized and of course I canned some more (somebody stop me!). We camped by a creek on my grandpa’s property with the whole family. I picked way too many onions, canned way too much grape juice (all in one crazy marathon day!). I flung doors wide open and smiled at still warm breezes coming through. Bennet got a bob and Bj cooked everything possible in his new Big Green Egg. We saved seeds and made pizza, and played in the sink.


In October we were still getting lots of yumminess from our garden. Even eating melons at the beginning of the month! Then Bj, Bennet and I went to beautiful upstate New York for a wedding of a dear friend. Bennet slept through the night, which we celebrated at the carousel (sadly this didn’t last). There were harvest festivals to go to. A girls craftcation weekend which was exactly what I needed. Meanwhile Tuesday was getting so proficient on her bike she managed to get up some big hills at the park. I made the girls’ costumes for halloween.


November saw us turning to the inside, playing lots of games, writing lots of notes. Tuesday started playing more with neighborhood kids, and often bunches of them will be in someone’s driveway playing. I love the sound of it. I finished a quilt for my friends, my favorite to date. I started knitting again. The living room was taken over by a large cardboard house. We spent Thanksgiving at my in-laws in the Tri-Cities. Probably our last… They put an offer on a house in our neighborhood and it was accepted!


Finally December, in which I ignored the blog completely. We made Christmas scented cleaner. We played lots and lots of games. I started sewing a lot again, mostly my quilts. I counted at least 20 UFOs, for shame! Lots of sensory play (baking soda dough, water play, etc.). Tuesday listened to so many audiobooks, many on repeat. I knit a lot of washcloths. Carmen came for a girls weekend in Portland with me. I hosted another crew girl Christmas. We went for a lovely Christmas walk and came up with new traditions for our family. And we played games, and read books, and played more games.


Along the way we did lots of learning at home, had fun with Daisy Girl Scouts, Bj rocked his job (and traveled a freaking ton!), and I managed to be crafty more often than not. Tuesday wore her prairie girl outfits constantly. And her baby “Tootsie” was with her more often than not. And if all that seems pretty wonderful, it was! I didn’t put a single negative thing in this post. There were hard days and many more hard nights (still no sleep for the weary around here!). But I love looking back on all the positive things that happened! I’m feeling so great about 2015 too. One of my dearest friends is getting married, and I’m sure that will be a huge part of it. So exciting. Tuesday and Bennet are growing and learning by leaps and bounds. I feel like I’ve hit a bit of a stride with homeschooling, or at least most of the panic has subsided.
I’ve realized when you go to look for wonderful things in your life surely you will find them. And this picture heavy post proves that. I don’t like to call it luck. But damn, I have it good.

Celebrating crafts, kids and the everyday through photographs.
-
3 comments on 2014
-
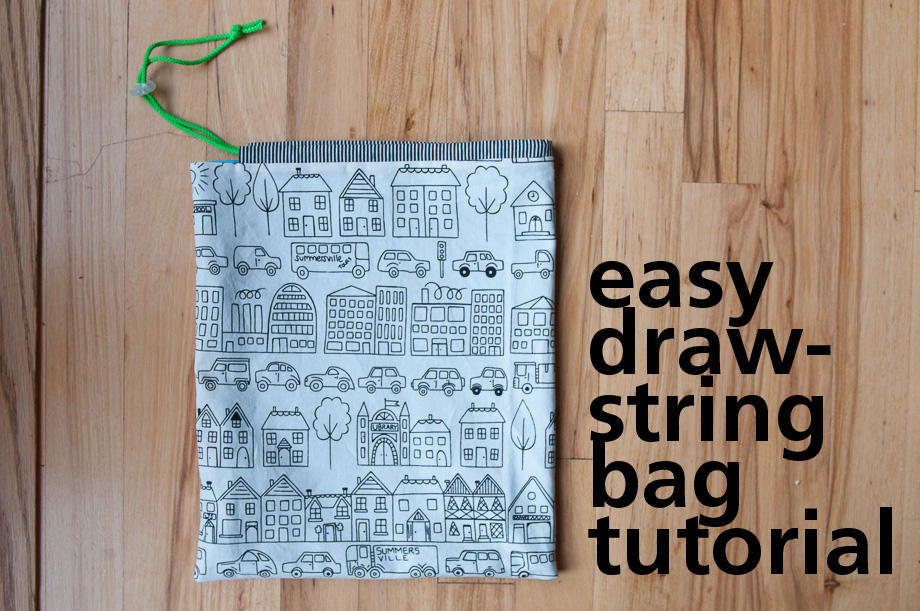
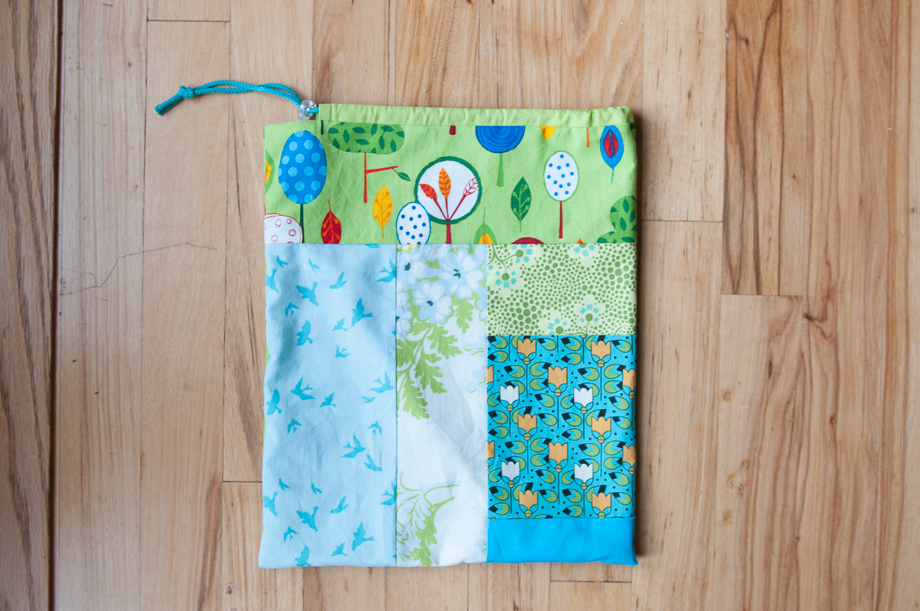
I don’t know about anyone else, but the beginning of this year (hello 2015!) has made me want to organize! I have loved this tutorial by my friend from quilt guild, and asked her if I could update it a bit to show off my mom’s lovely cord. I made a bunch of these bags a few years ago, so I thought it was time for a fresh set.
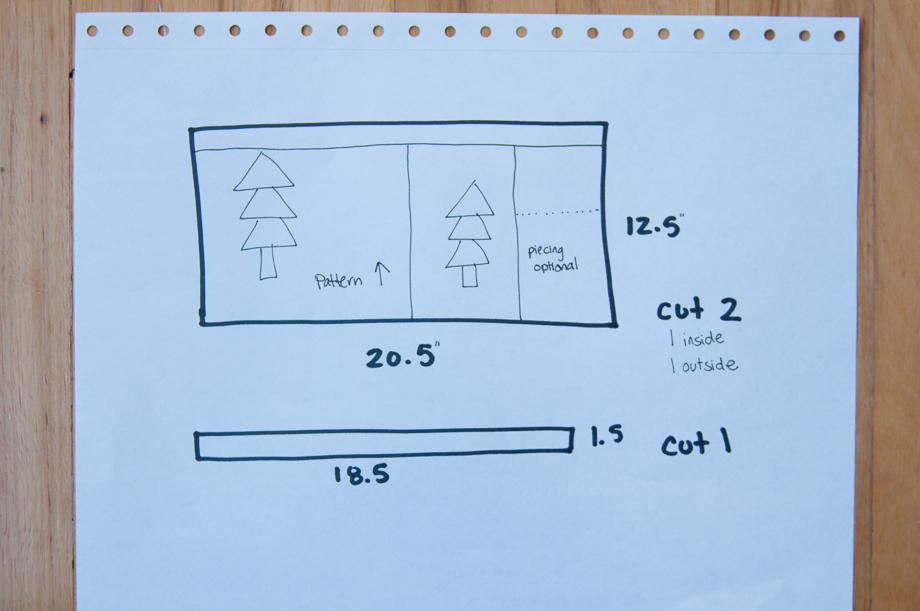
Here is a diagram for cutting on dot matrix paper, because I’m so fancy like that. One of the 12.5 x 20.5 inch pieces can be pieced, if you want to use up scraps, or orphan quilt blocks. Megan’s tutorial has more information on making custom sizes, I just chose this one size for ease of the tutorial.
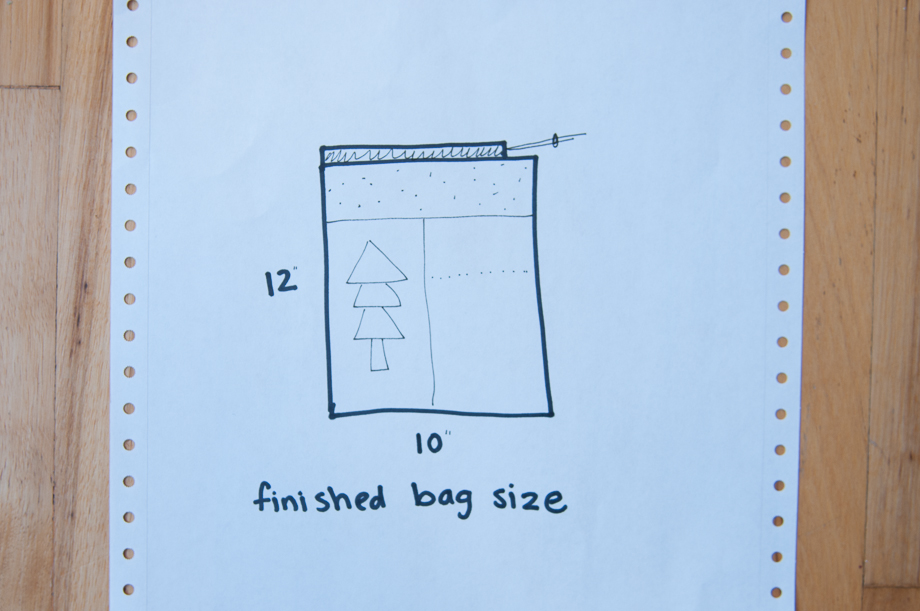
And this is the finished bag size. It can be reversible if you choose to hand stitch the opening closed (see below).
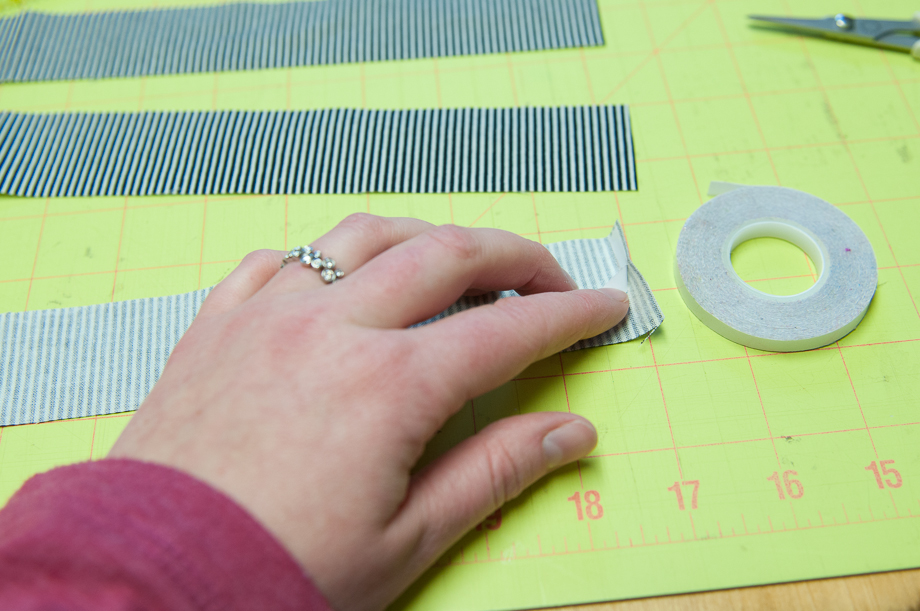
After you cut the pieces take the long skinny strip and use wonder tape to tack down about a quarter inch of the edge. It’s basically a sticker so it’s super easy to use.
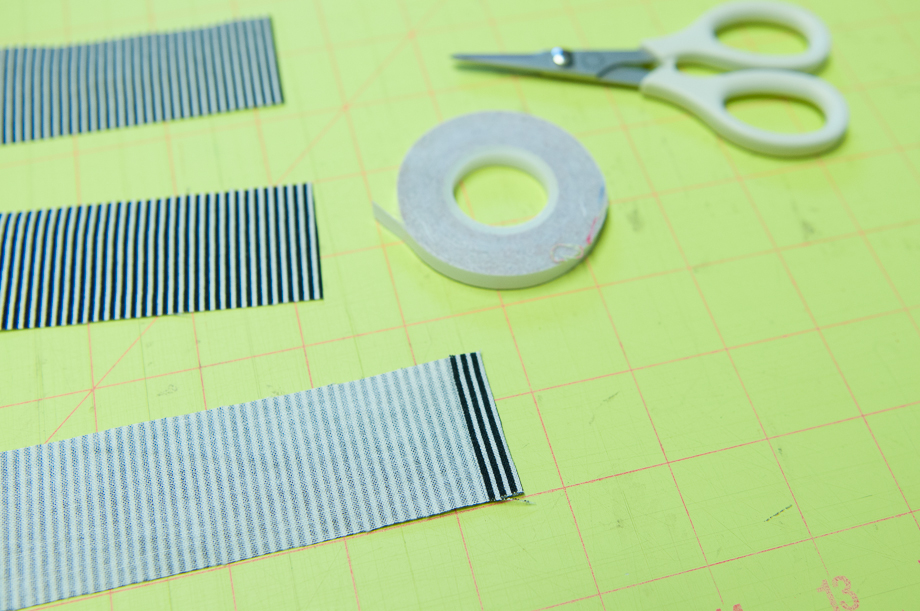
After this fold and iron wrong sides together.
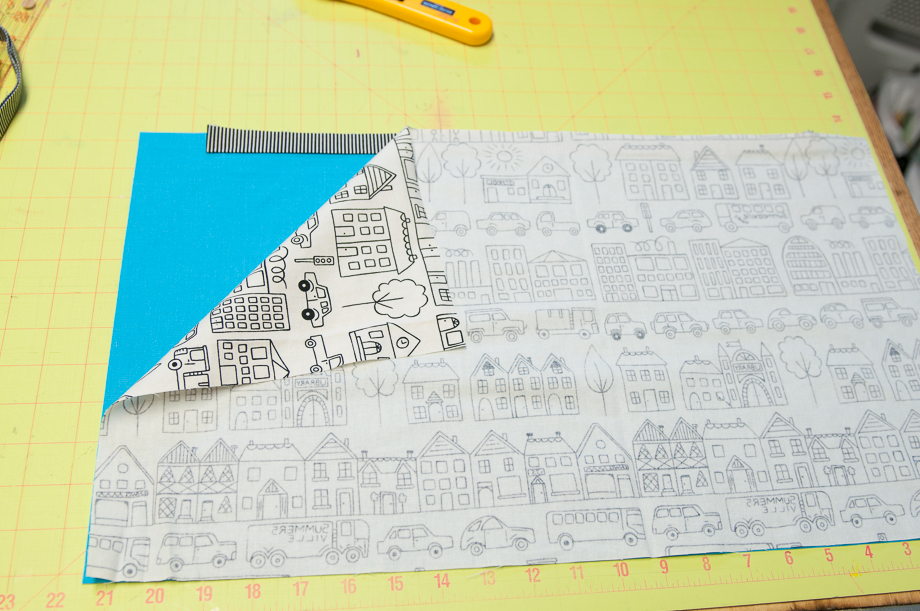
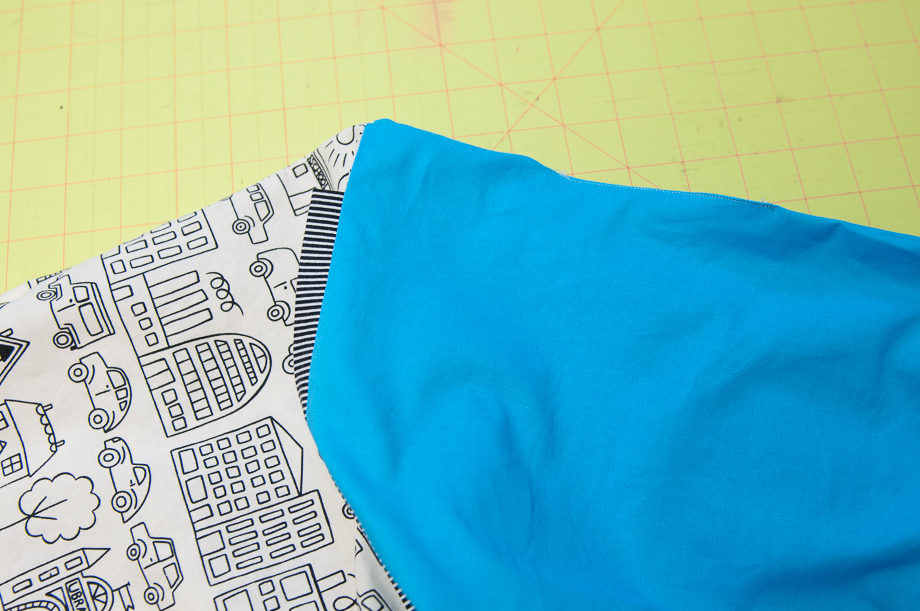
Lay the inside fabric right side up, then center the strip you just iron with raw edges facing the top, and finish the sandwich with the exterior fabric on top, right side down. If you have a directional fabric you need the pattern to face up. I tried to pick a very obvious pattern for the tutorial so you can see what I mean. Pin all along the top and stitch with a quarter inch seam – too wide of a seam and you won’t have room to thread the cord through.
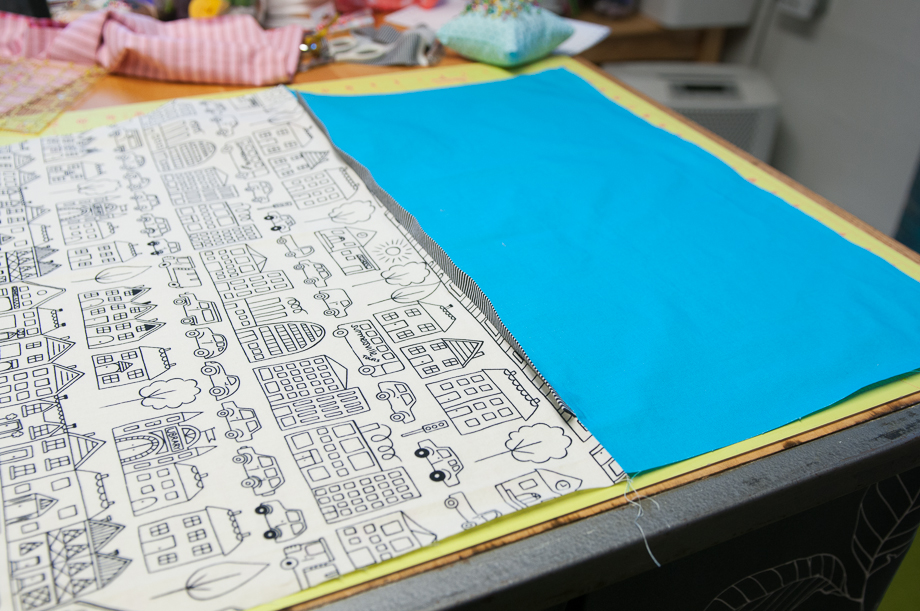
After you stitch that seam your bag will look like this opened up. You can see here I’ve pressed the seam down, so the little casing we’ve now made for the cord stands up.
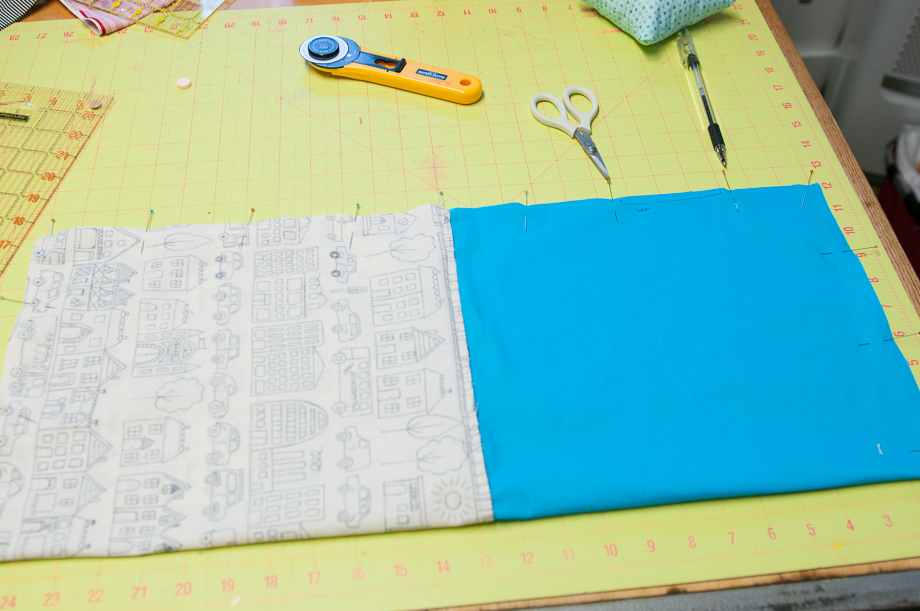
Next fold the bag like so and pin all around the edge. Again you are going to sew with a quarter inch seam allowance, leaving the small gap you see between the scissors and pen open to turn the bag right side out.
After sewing clip corners, to get rid of extra fabric and push out. Then flip the bag through the opening.
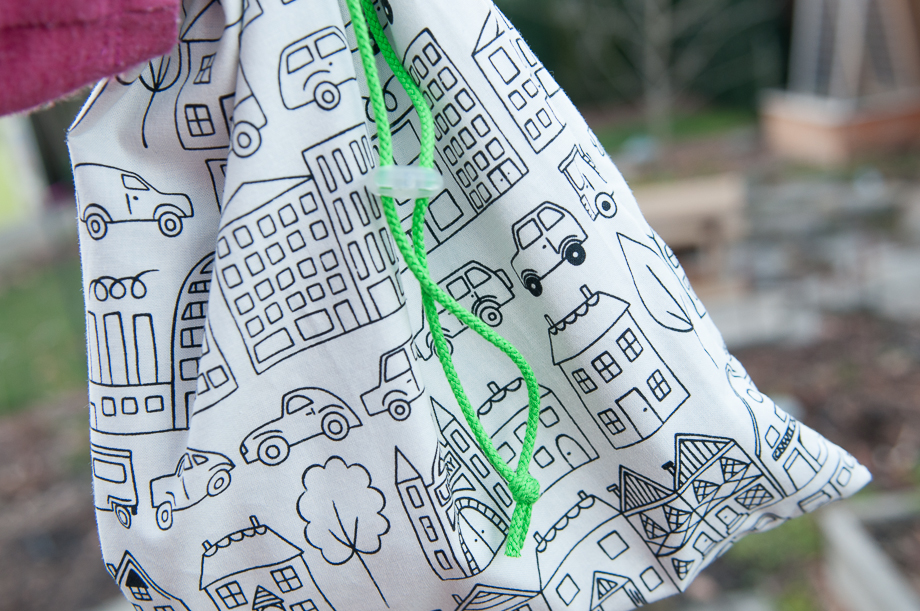
You’ll need to sew closed the opening. I decided not to worry about the bag being reversible, so I just did a straight stitch over the opening. Then I tucked the inner lining down into the bag and threaded cord through the casing.
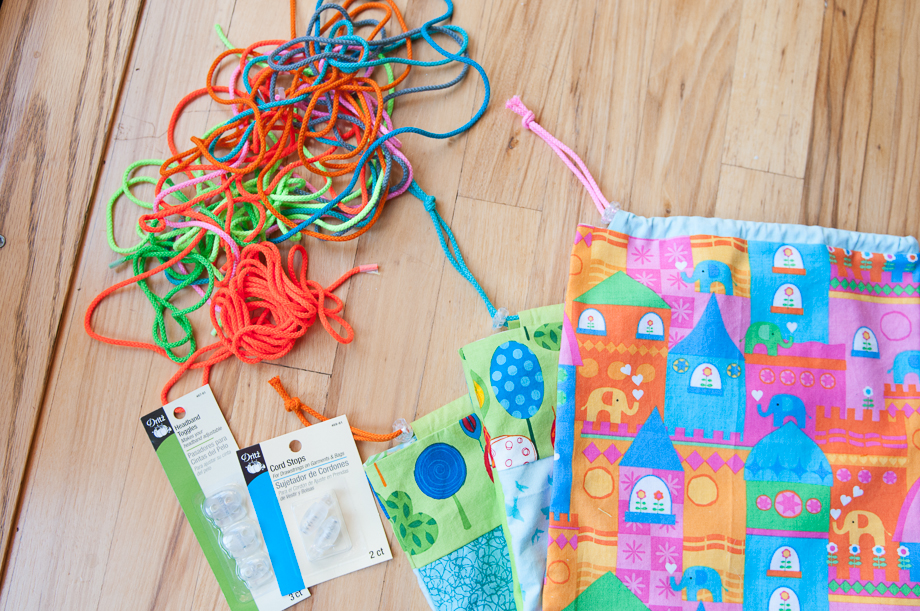
Ribbon Jar has so many awesome cords. I loooooove the neons.
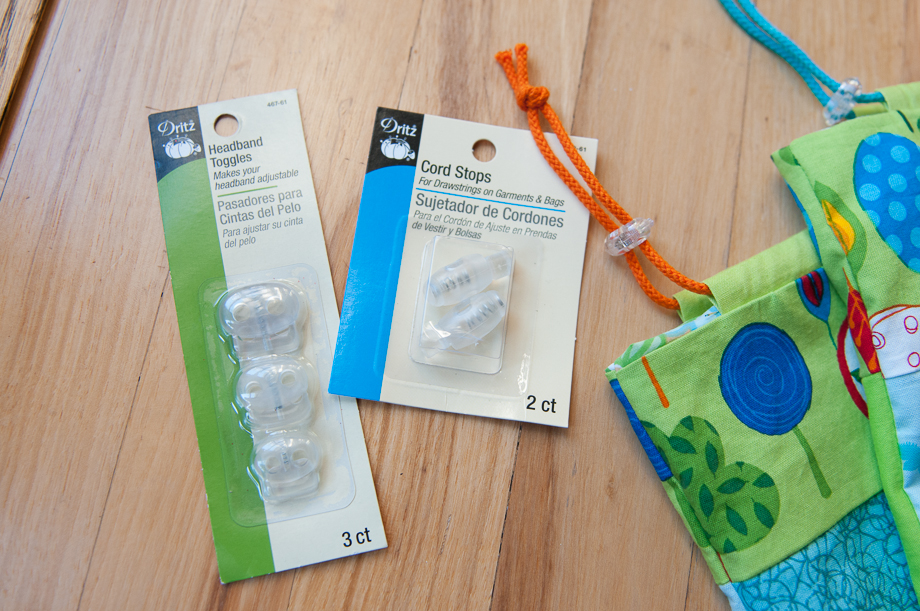
There are a couple types you can use. Either the toggle, which has two openings or stops, which has one. Both are a tight squeeze, which is really what you want anyway. Use a paper piercer, large needle, awl, or tip of very sharp scissors to get the ends through (and be careful!). I like to tie the two sides together so you can hang the bag.
Super fast, awesome project! And like I referenced in my last post about these, they make great reusable gift bags.
Here is a pieced version of the same bag.
Supplies needed for easy drawstring bag:
Fabric cut list:
(2) 12.5″ x 20.5″ pieces of fabric (piecing optional)
(1) 18.5″ x 1.5″ piece of fabric for casing
Cording: I used about 26″. It’s sold by the yard, so if you buy a couple yards of a color, you’ll get three bags worth (that would give you 24″ per bag). My mom retired so Ribbon Jar is closed, but here is a link to a similar cord on Amazon.
Cord Stop
Wonder Tape -


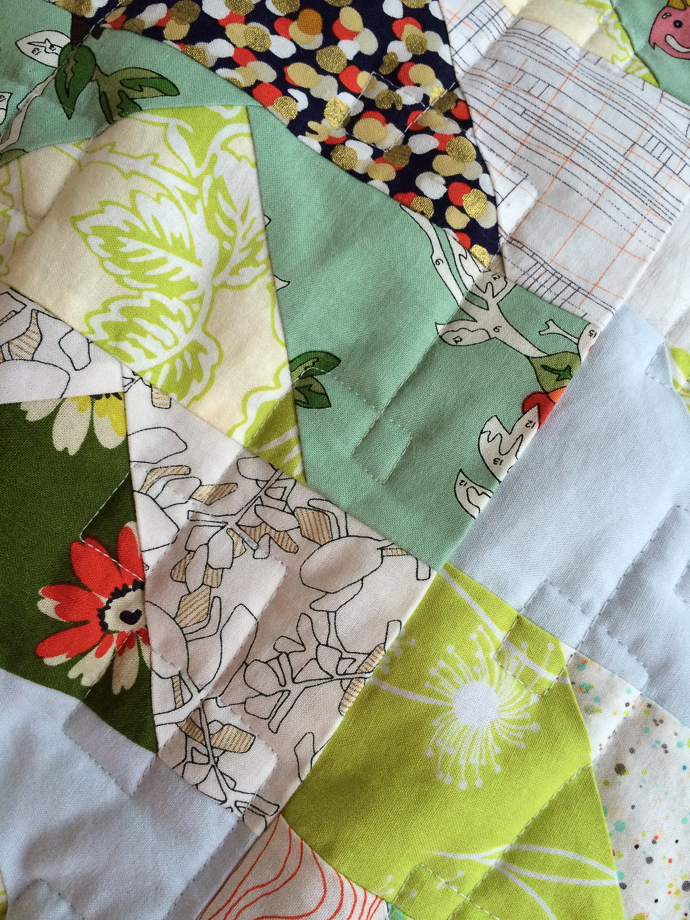


The wedding in New York that Bj and I went to was for some dear friends, and I knew I wanted to make them a quilt. Matt is an architect and there was this Arcitextures line of fabric that was so perfect. As soon as I met his sweetheart Krista I knew it was true love and bought the fabric. And even though they sent a save the date I waited until less than a month before the wedding to start the quilt. I think I was really waiting for inspiration to set in. See, I had the fabric, but wasn’t sure what direction to go in for design. On September 20th I took a class from the super talented Rachel, who I also am lucky enough to call my friend. She teaches a wonky geese method and I was hooked. Now you may remember that I said, “geese never again!” Well this technique had me hooked, and by the 23rd I had a pretty decent amount of blocks. I decided to actually do the math this time and realized for a sizable throw (they both have to fit under it!) I needed a lot more. I got going and by the week before the wedding I had all the blocks done. I arranged and rearranged and started sewing them into rows. Then I stopped.
I was going to try and power through, stay up all night and get it done, but I realized I wanted it to have a hand bound binding, and a special label. If I rushed it that just wasn’t going to get done. So reluctantly I gave up trying to finish it before the wedding. As soon as I got back it was on my mind again. I finished piecing the top and had it pin basted in time to take to craftcation. I quilted it in a sort of wonky traveling box stitch I came up with. Free motion, on my Juki. I love the quilting pattern and will, for sure, use it again. The warm and cozy wool batting is just perfect for it too. I pieced together a scrappy orange binding, machine sewed it on, then spent a week hand sewing the binding to the back with a blind stitch. I am S-L-O-W at this, but it just looks too lovely so I had to do it. Last up was the label. I copied this label from a famous quilt maker. I really liked this Gel Roller (affiliate link) I used to mark on the fabric. I’ve used in on apparel before and it holds up.
I’m happy to say Matt and Krista got the quilt tonight and they love it! Yay!


recent posts
archives
2 page layouts 8.5×11 layouts 12×12 layouts Alaska birthday birthday party brads canning Carmen Chloe crew girls dining room DIY elimination communication fair fall food front yard hair Halloween iPhone misting Montessori newborn nighttime night time oregon oregon coast oregon state fair organization painting painting with kids party portland punches ribbon salem Sciarrino scrapbooking sewing on scrapbooking Silhouette sleep toddler Tuesday tulips