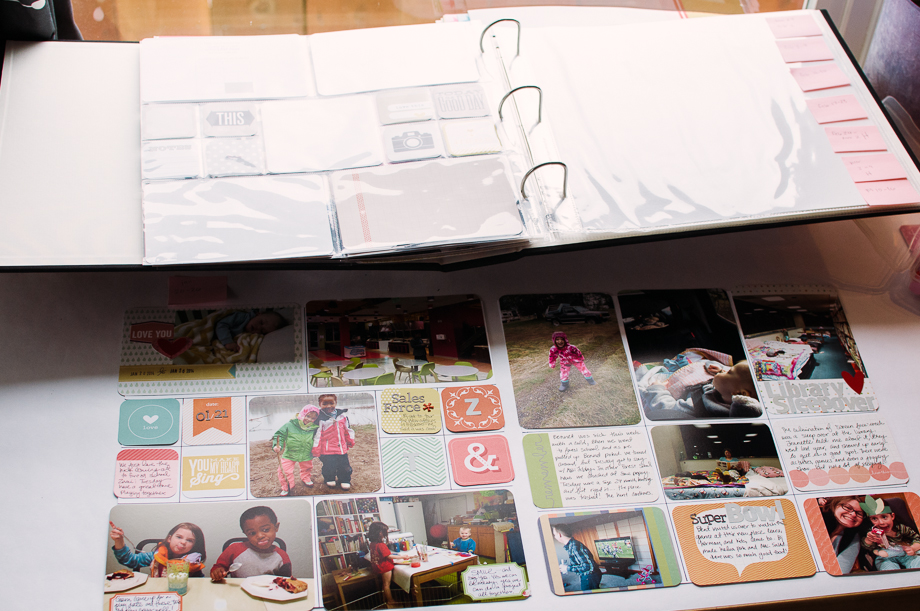
When I scrapbook I tend to work in little bits here in there. Lets be honest, little bits is how I get most of my crafting time done. I do get bigger chunks, but it seems like I have to be ready to drop it at a moment (baby wakes up, pot is about to boil over, phone rings, etc.). So I have to have my projects in a place I can get to them, but one that little fingers won’t find so tempting or easy to get to. Project Life is one of those things that I have out a lot. It lends itself well to doing little bits at a time. Printing the photos (I do this at home), pulling out cards, dressing them up with stickers, journaling… I rarely do all of that in one sitting. But one thing that was driving me crazy was having a giant 12×12 scrapbook open on my desk. It takes up pretty much the whole working area. Plus it’s awkward and slick to be working on top of the page protectors. When I had everything laid out then I had to lift up one side of the plastic to get my photos in. Like I said, annoying.
It’s huge! The book measures 33 x 13.75 inches open! I came up with a solution that is so easy! I saw on Marcy Penner’s blog when she was doing this size Project Life that she had something similar, I caught a glimpse of it in one of her videos but never found more info out about it.
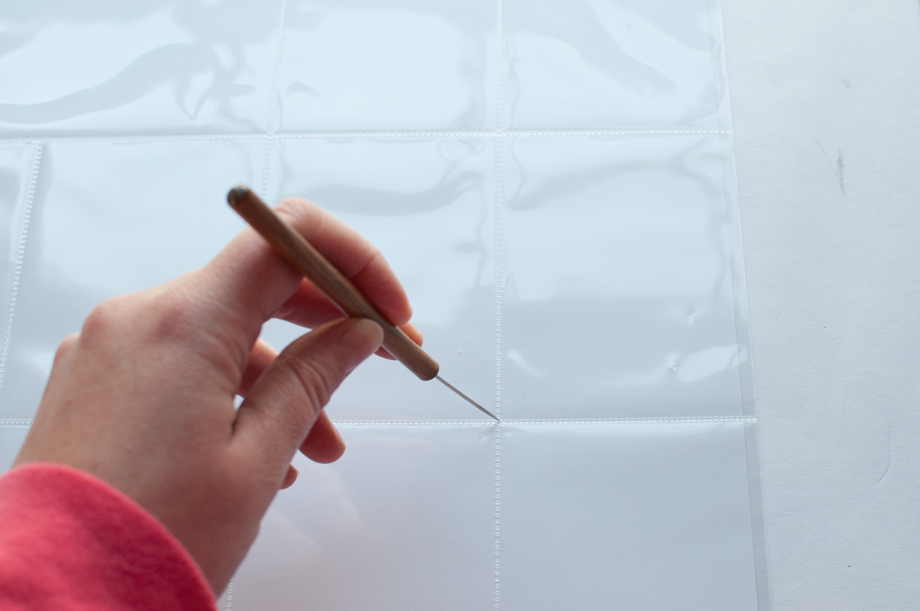
I made my simply by laying a page protector over a sheet of 12×12 white cardstock (the plastic is bigger than the paper, just make sure it is hanging out evenly). I took a small awl and poked a hole in the intersections of the individual pockets (it does not damage the page protectors).
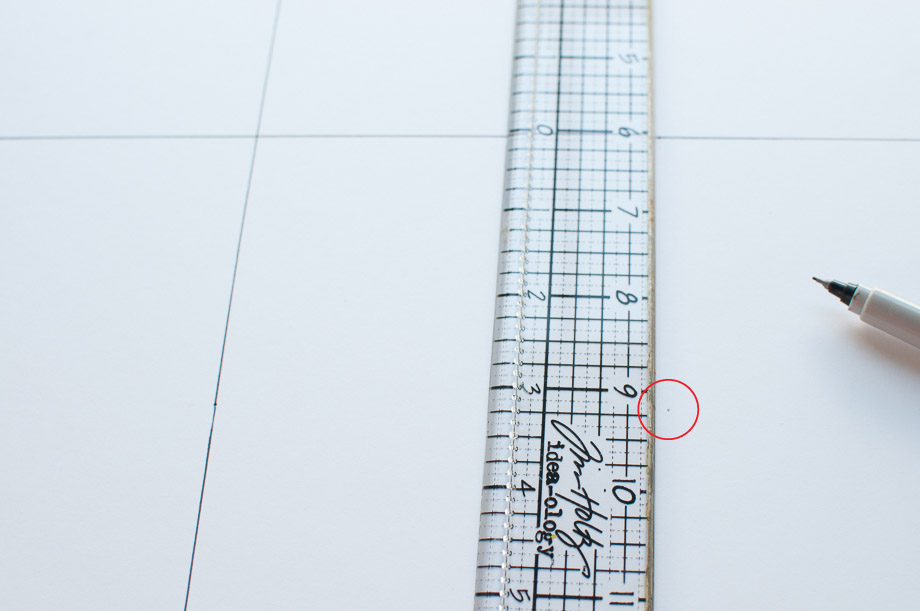
Then I simply took a ruler and a sharpie and connected the dots. It’s important to note that the outside “pockets” will be too small. That doesn’t really matter as this is more of a visual guide, than an exact thing. You can see in the photos that the pictures “hang off” the edge of the paper. It doesn’t bother me enough to search out bigger paper.
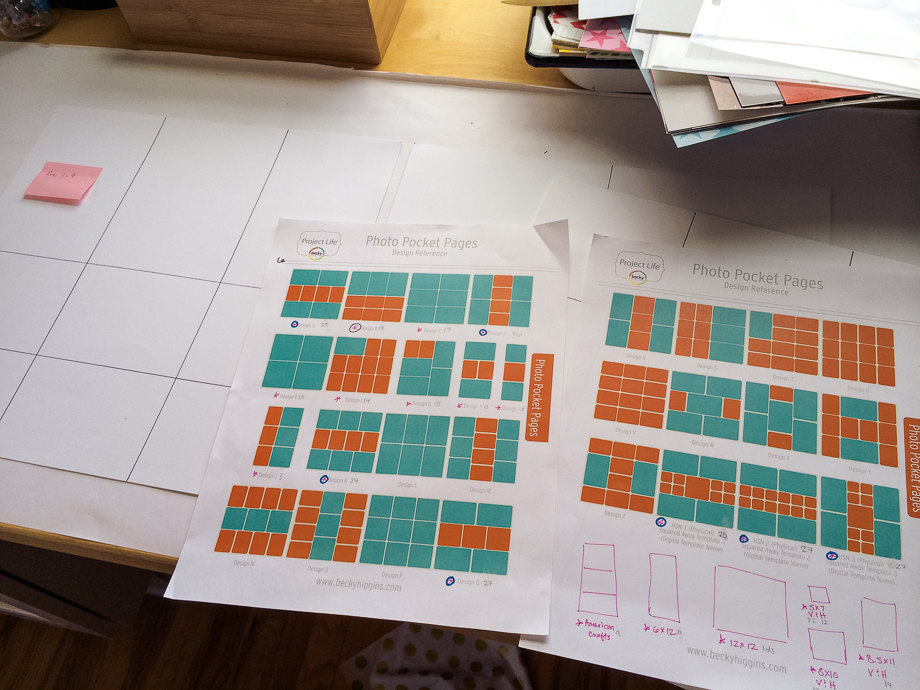
I printed out Becky Higgin’s handy (and free) reference sheet. Under each style I stared it if I owned some and put in pencil how many. If I’ve made a template for the style I circle the star.
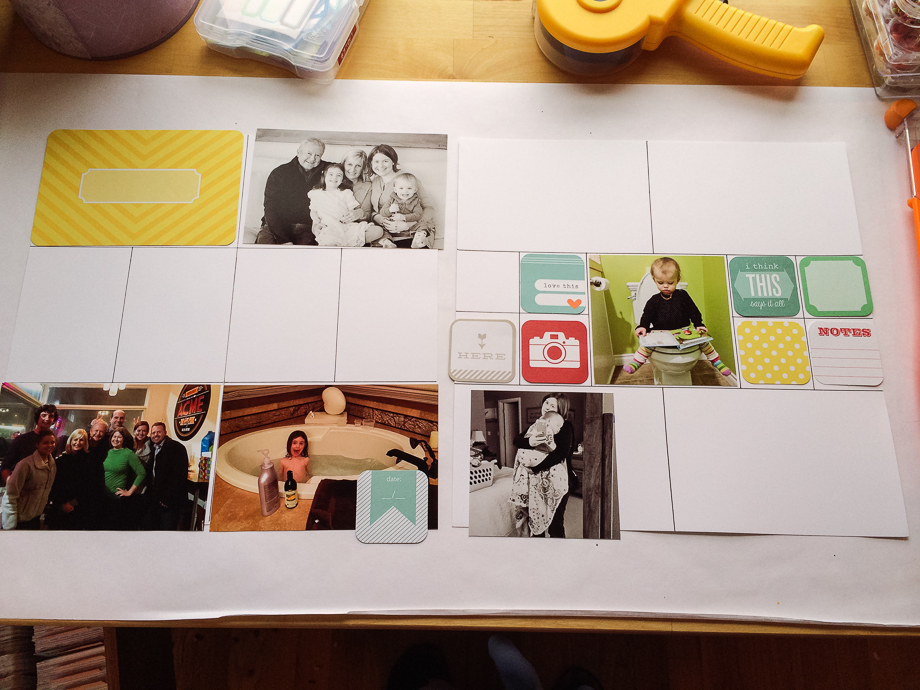
Here is a shot of it in action. In this case I’m still working on printing out my photos and filling in with cards. Once I’ve decided what will go in all the pockets I get out the album and fill it up!
I can’t tell you how much better I love this system. Having the project be totally flat means I can put stuff on top of it if I need to (like a tray from another craft project). I’m sure piling up projects in process is not for everyone, but I like the option of getting things up on one of the highest surfaces in my house (Bennie has sticky fingers!). I’ve added lots of photos to show how to do it, but really it’s a super easy and quick system to implement. If having the album out is driving you nuts try this!
And let me know if you would be interested in a general overview of how I put my weekly spreads together. I really have it down so they are super quick, but can be more embellished if I feel like it.

Celebrating crafts, kids and the everyday through photographs.
-
-
(Tuesday biked the 2.5 mile round trip to the library… got hot and had to change into Bennet’s extra shirt!)
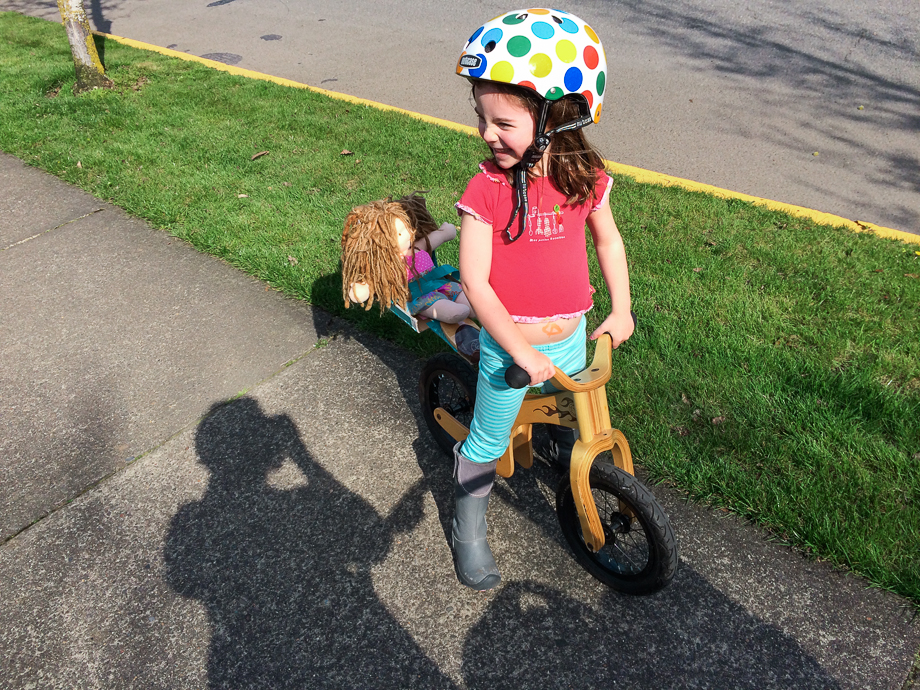
I bought Tuesday this balance bike three years ago (when she was two). I tried to get her the ubiquitous Skutt, but had to return it because it was way too big for her. We found this Early Rider bike on clearance at Gilt and decided to give it a go since it has a smaller profile. Not that any of that really mattered since she basically took no interest in it whatsoever for years. She would never try and sit on it and we didn’t push it. Every once and a while I’d get it out, but she loved her trike, and preferred that.
Fast forward to a few weeks ago. I don’t even know what happened. She saw the bike in the garage, or we were talking about bikes or hmm, I don’t know. But she wanted to try this so she put on her helmet, got on and away she went. Within two days she could glide with her legs out in front of her for almost a block! As soon as she showed interest in the bike I jumped on it and asked her if she wanted to make a dolly bike seat for Apple (I showed her this pin). She said yes!
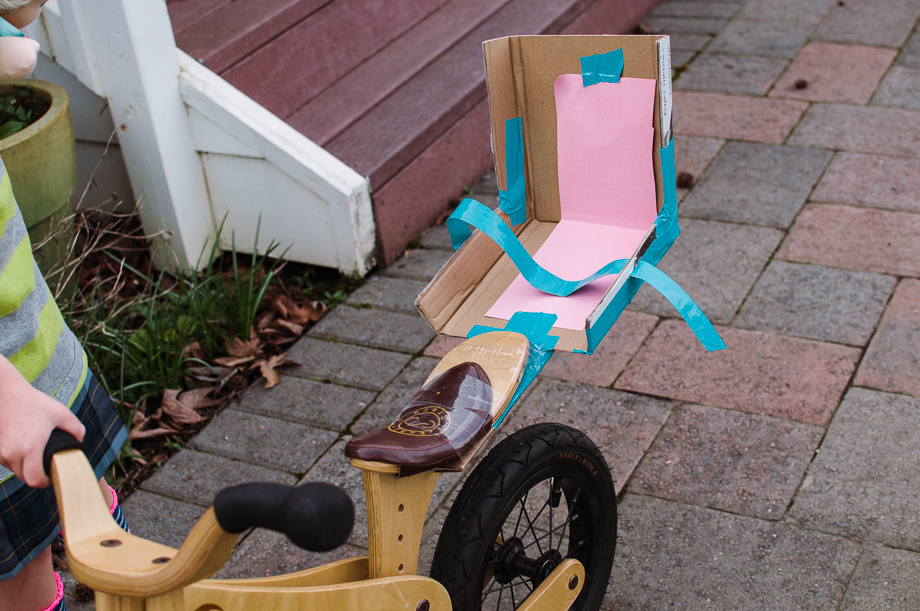
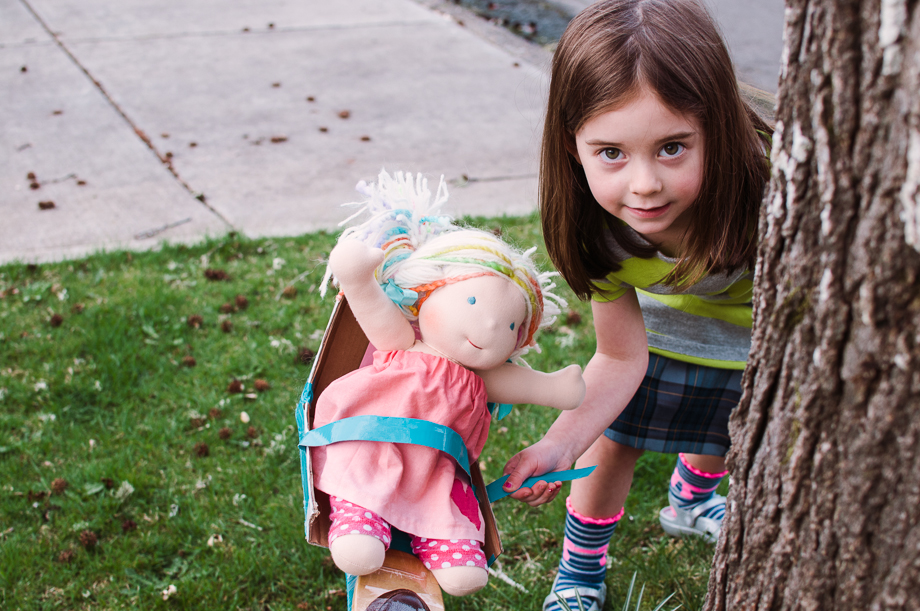
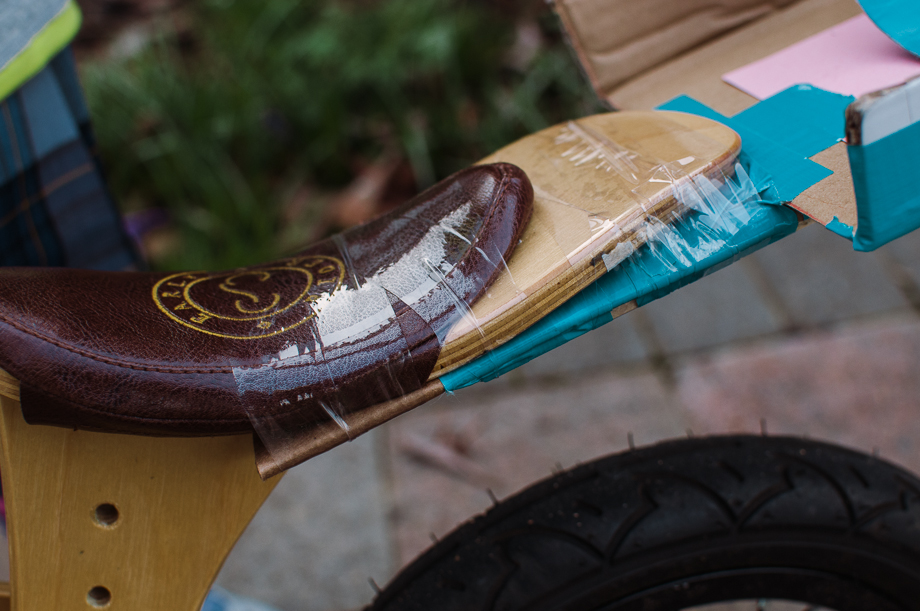
This is the seat we came up with after a little trial and error (the pink is simply a design element Tuesday added). The basic idea of the seat is the same as the original post, but we tweaked it a bit. First of all, Apple would not stay in the seat with out a seatbelt. So I just folded duct tape length wise and cut a hole through the cardboard to cinch it up. Tuesday specifically requested this next picture to show how she makes sure her dolly* is snug:
Eventually that tiny bit of cardboard above the hole gave way, I just put tape above it, which I should have done in the first place.
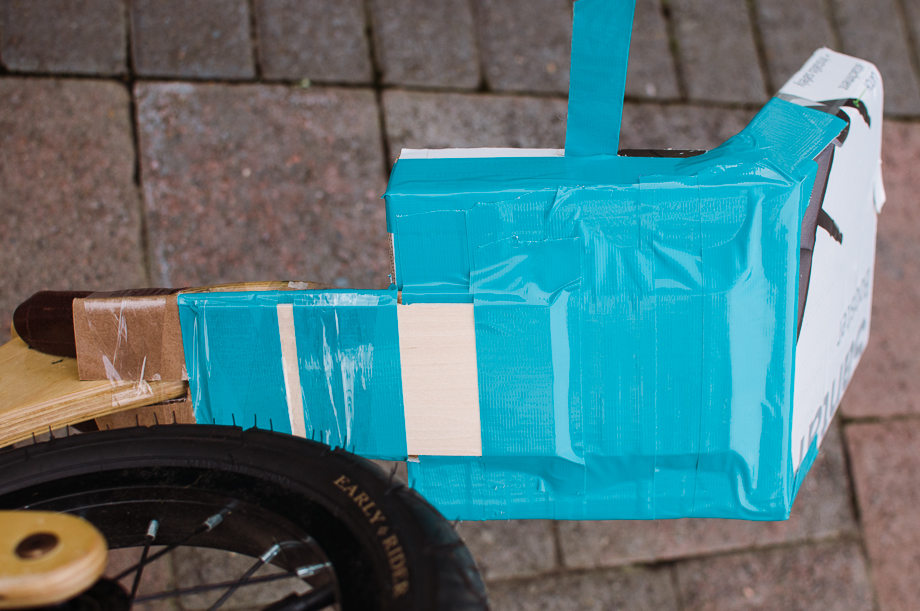
This is the bottom of the seat, and the main thing we changed. Instead of just cardboard we used a piece of balsa wood we had laying around as a secure base to attach the dolly seat to the seat of the bike. We tried cardboard first and the weight of the doll quickly bent it.
Now, lest you think I’m crazy for putting packing tape all over her fancy looking balance bike, let me introduce you to Hugo’s Amazing Tape. I’m pretty sure we will be keeping a roll of this in our house indefinitely. And since it’s reusable it will probably be the same roll! Why is it so amazing? Because it only sticks to itself. Yes, it really is amazing. So there is no sticky residue on the dolly seat or the bike seat. And since you can use it again and again I wrapped around a liberal amount.
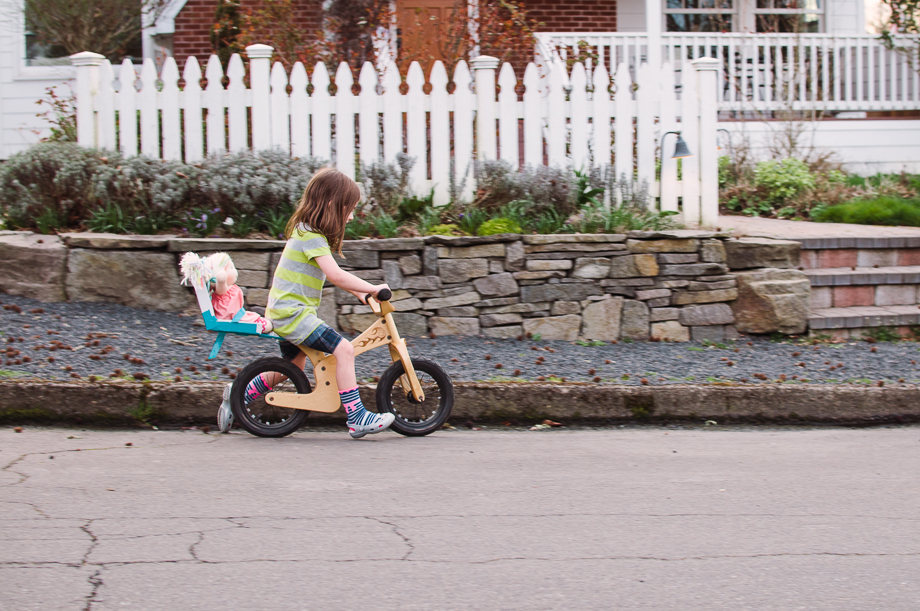
(Tuesday could not believe I even wanted her to pose with her bike without her helmet, the sun was fading, but we always wear a helmet! It’s the law here in Oregon!)
The dolly seat was made with the thickest cardboard we could find, from a booster seat box. It’s held up great. The bike has no kickstand so she has to lay it down, or lean it up against things. This hasn’t been a problem for the seat. Now we’re just trying to decide when to move her to a pedal bike. Has anyone used one of these balance bikes? How did the transition go?
*the doll with rainbow highlights is Pepper, Bennet’s doll… Tuesday’s doll Apple was already dressed in Pj’s, and unfortunately, not available for this impromptu shoot.
Affiliate links, where possible. -
Just a heads up, incase you are at all inclined to join, we are doing another no spend month. We did no spend September and I can say with certainty that it was THE BEST month for our family ever.
(fun and free!)
I got the idea from the NW Edible Life blog. We didn’t actually spend no money. We gave ourselves a $400 budget, and I summarized our spending on this post. We ended up spending $412.49 plus re-occuring monthly costs (dance class, mortgage payment, etc.). It was a great exercise for us, and not just for financial reasons. When we decided to account for every penny we were no longer going to “run errands” or “pick something up”. We didn’t wait until the last minute to figure out what to eat for dinner. We had to plan it out. We didn’t want to drive anywhere because of gas. This meant a lot more family time, lots of walks and biking. Of course it was different in September, when there was so much bounty to be had, for cheap. We’ll see how it works out in April.
Something else I’m trying is #100happydays. I’m super excited about this one too. Everyday you find something that makes you very happy, take notice of it, and document it somehow (instagram, facebook, etc.). I’m planning on doing a weekly roundup of our favorite happy things. This goes great with my word of the year: Smile. The site states that 71% of people starting this project fail because they don’t have time to be happy. I am going to make time. How cool would it be to be known as the happiest person on the block? Sounds good to me!
I also found 40 bags in 40 days (a bit late). And I have been doing some spring cleaning. I may not fully participate on that one, but I love the idea. So even if you’re not interested in these three things you can find something fun to join in online. There is so much good stuff out there! Have you participated in an online group activity like this? I’d love to hear about your experience. And I’ll let you know how we’re doing as the month (and 100 days) go on.


recent posts
archives
2 page layouts 8.5×11 layouts 12×12 layouts Alaska birthday birthday party brads canning Carmen Chloe crew girls dining room DIY elimination communication fair fall food front yard hair Halloween iPhone misting Montessori newborn nighttime night time oregon oregon coast oregon state fair organization painting painting with kids party portland punches ribbon salem Sciarrino scrapbooking sewing on scrapbooking Silhouette sleep toddler Tuesday tulips